Applies To: Excel 2016 Excel 2013
When Microsoft Excel detects a corrupted workbook upon opening, it automatically starts File Recovery mode and attempts to repair the workbook. If File Recovery mode doesn’t start, try using this manual process to recover your workbook:
- Click File > Open.
- Click the location and folder that contains the corrupted workbook.
- In the Open dialog box, select the corrupted workbook.
- Click the arrow next to the Open button, and then click Open and Repair.
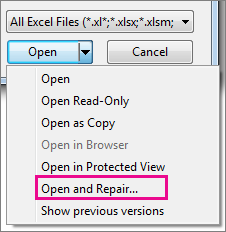
- To recover as much of the workbook data as possible, pick Repair.If Repair isn’t able to recover your data, pick Extract Data to extract values and formulas from the workbook.
If neither automatic nor manual repair works, there are some recovery methods that might help salvage your data. You can also take some preventive measures to avoid losing your work by automatically saving a backup copy of your workbook or creating a recovery file from time to time.
Recover data from a corrupted workbook
Choose one of the following methods to help recover your data. If it’s not successful, try another method. You can also try third-party software solutions to try to recover workbook.
IMPORTANT: If a disk error or network error prevents you from opening a workbook, move the workbook to a different hard disk drive or a local disk before trying any of the following recovery options.
Recover data when the workbook is open in Excel
- Revert the workbook to the last saved version If a workbook becomes corrupted while you work but before you save your changes, you can revert your workbook to the last saved version:
- Click File > Open.
- Double-click the name of the workbook that you have open in Excel.
- Click Yes to reopen the workbook.The workbook opens without any changes you made that might have caused the workbook to become corrupted.
Recover data when you can't open the workbook in Excel
- Set the calculation option in Excel to manual Try changing the calculation setting from automatic to manual. Because the workbook won't be recalculated, it may open.
- Click File > New.
- Under New, click Blank workbook.
- Click File > Options.
- In the Formulas category, under Calculation options, pick Manual, and then click OK.
- Click File > Open.
- Locate and then double-click the corrupted workbook to open it.
- Use external references to link to the corrupted workbook To retrieve only data and not formulas or calculated values from the workbook, try using external references to link to the corrupted workbook.
- Click File > Open.
- Go to the folder that contains the corrupted workbook.
- Right-click the file name of the corrupted workbook, click Copy, and then click Cancel.
- Click File > New.
- Under New, click Blank workbook.
- In cell A1 of the new workbook, type =File Name!A1, where File Name is the name of the corrupted workbook that you copied in step 3, and then press Enter.NOTE: You have to enter only the name of the workbook—you don’t have to type the file name extension.
- If the Update Values dialog box appears, select the corrupted workbook, and then click OK.
- If the Select Sheet dialog box appears, select the appropriate sheet, and then click OK.
- Select cell A1.
- Click Home > Copy, or press Ctrl+C.
- Select an area, starting in cell A1 that is approximately the same size as the range of cells that contain data in the corrupted workbook.
- Click Home > Paste, or press Ctrl+V.
- With the range of cells still selected, click Home > Copy again, or press Ctrl+C.
- Click Home > the arrow below Paste, and then under Paste Values, click Values.Pasting values removes the links to the corrupted workbook and leaves only the data.
- Use a macro to extract data from a corrupted workbook If a chart is linked to the corrupted workbook, try using a macro to extract the source data of the chart.
- Copy the following macro code and paste it in a module sheet:Sub GetChartValues()Dim NumberOfRows As IntegerDim X As ObjectCounter = 2' Calculate the number of rows of data.NumberOfRows = UBound(ActiveChart.SeriesCollection(1).Values)Worksheets("ChartData").Cells(1, 1) = "X Values"' Write x-axis values to worksheet.With Worksheets("ChartData").Range(.Cells(2, 1), _.Cells(NumberOfRows + 1, 1)) = _Application.Transpose(ActiveChart.SeriesCollection(1).XValues)End With' Loop through all series in the chart and write their values to' the worksheet.For Each X In ActiveChart.SeriesCollectionWorksheets("ChartData").Cells(1, Counter) = X.NameWith Worksheets("ChartData").Range(.Cells(2, Counter), _.Cells(NumberOfRows + 1, Counter)) = _Application.Transpose(X.Values)End WithCounter = Counter + 1NextEnd Sub
- Insert or delete a worksheet into your workbook right-click its sheet tab, and then rename it ChartData.
- Select the chart from which you want to extract the underlying data values.NOTE: The chart can be embedded on a worksheet or on a separate chart sheet.
- The data from the chart is put on the ChartData worksheet.
Automatically save a backup copy of a workbook
With a backup copy of your workbook, you'll always have access to your data if your workbook is deleted accidentally or if it becomes corrupted.
- Click File > Save As.
- Click Computer, and then click the Browse button.

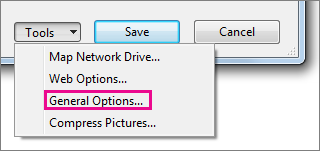
- In the Save As dialog box, click the arrow next to Tools, and then click General Options.
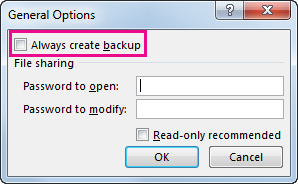
- In the General Options dialog box, check the Always create backup box.
Automatically create a recovery file at set intervals
A recovery file of your workbook also helps ensure you'll have access to your data if your workbook is deleted accidentally or if it becomes corrupted.
- Click File > Options.
- In the Save category, under Save workbooks, check the Save AutoRecover information every box, and then enter a number of minutes. (The default is 10.)
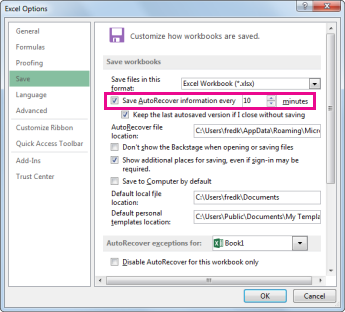
- In the AutoRecover file location box, enter the location where you want to save the recovery file.
- Make sure that the Disable AutoRecover for this workbook only box is unchecked.
Source: Microsoft



No comments:
Post a Comment